这是学习的第四篇文章,整一个前端的渲染引擎并且用bootstrap美化一下样式。
Thymeleaf
数据动态地渲染,这里采用Thymeleaf模板引擎。
首先是引入依赖:
1
2
3
4
| <dependency>
<groupId>org.springframework.boot</groupId>
<artifactId>spring-boot-starter-thymeleaf</artifactId>
</dependency>
|
后端的controller:
1
2
3
4
5
6
7
8
9
10
11
12
13
14
15
16
17
18
19
| @RestController
@RequestMapping("/report")
public class WeatherReportController {
@Autowired
private IWeatherReportService weatherReportService;
@Autowired
private ICityDataService cityDataService;
@GetMapping("/cityId/{cityId}")
public ModelAndView getReportByCityId(@PathVariable("cityId") String cityId, Model model) throws Exception {
Weather weather = weatherReportService.getDataByCityId(cityId);
model.addAttribute("title","蜗牛天气预报");
model.addAttribute("cityId",cityId);
model.addAttribute("cityList",cityDataService.listCity());
model.addAttribute("report",weather);
return new ModelAndView("weather/report","reportModel",model);
}
}
|
前端的简单页面:
1
2
3
4
5
6
7
8
9
10
11
12
13
14
15
16
17
18
19
20
21
22
23
24
25
26
27
28
29
30
31
32
33
34
35
36
37
38
39
40
41
42
43
44
| <!DOCTYPE html>
<html lang="zh-CN" xmlns:th="http://www.thymeleaf.org">
<head>
<meta charset="UTF-8">
<title>蜗牛天气预报系统</title>
</head>
<body>
<h3 th:text="${reportModel.title}">snail</h3>
<select>
<option th:each="city : ${reportModel.cityList}"
th:value="${city.cityId}"
th:text="${city.cityName}"
th:selected="${city.cityId eq reportModel.cityId }">
</option>
</select>
<h1 th:text="${reportModel.report.city}">城市名称</h1>
<p>
空气质量指数:<span th:text="${reportModel.report.aqi}"></span>
</p>
<p>
当前温度:<span th:text="${reportModel.report.wendu}"></span>
</p>
<p>
温馨提示:<span th:text="${reportModel.report.ganmao}"></span>
</p>
<div th:each="forecast : ${reportModel.report.forecast}">
<div>
<p th:text="${forecast.date}">日期</p>
<p th:text="${forecast.type}">天气类型</p>
<p th:text="${forecast.high}">最高温度</p>
<p th:text="${forecast.low}">最低温度</p>
<p th:text="${forecast.fengxiang}">风向</p>
</div>
</div>
</body>
</html>
|
注意
这里修正一下了一下之前存在的一个小错误,就是请求天气的接口应该是:http://wthrcdn.etouch.cn/weather_mini?citykey=xxx 而我之前程序中写的是http://wthrcdn.etouch.cn/weather_mini?cityKey=xxx
就是这个citykey中的k,应该是小写。导致请求不到数据,前端直接报错。
Bootstrap
稍微美化一下页面。引入bootstrap。
1
2
3
4
5
6
7
8
9
10
11
12
13
14
15
16
17
18
19
20
21
22
23
24
25
26
27
28
29
30
31
32
33
34
35
36
37
38
39
40
41
42
43
44
45
46
47
48
49
50
51
52
53
54
55
56
57
58
59
60
61
62
63
64
65
66
67
68
69
70
71
72
73
74
| <!DOCTYPE html>
<html lang="zh-CN" xmlns:th="http://www.thymeleaf.org">
<head>
<meta name="viewport" content="width=device-width, initial-scale=1, shrink-to-fit=no">
<link rel="stylesheet"
href="https://maxcdn.bootstrapcdn.com/bootstrap/4.0.0-beta.2/css/bootstrap.min.css"
integrity="sha384-PsH8R72JQ3SOdhVi3uxftmaW6Vc51MKb0q5P2rRUpPvrszuE4W1povHYgTpBfshb"
crossorigin="anonymous">
<title>蜗牛天气预报系统</title>
</head>
<body>
<div class="container controls-pane">
<div class="row">
<h3 th:text="${reportModel.title}">snail</h3>
<select class="custom-select" id="selectCityId">
<option th:each="city : ${reportModel.cityList}"
th:value="${city.cityId}"
th:text="${city.cityName}"
th:selected="${city.cityId eq reportModel.cityId }">
</option>
</select>
</div>
<div class="row">
<h1 class="text-success" th:text="${reportModel.report.city}">城市名称</h1>
</div>
<div class="row">
<p>
空气质量指数:<span th:text="${reportModel.report.aqi}"></span>
</p>
</div>
<div class="row">
<p>
当前温度:<span th:text="${reportModel.report.wendu}"></span>
</p>
</div>
<div class="row">
<p>
温馨提示:<span th:text="${reportModel.report.ganmao}"></span>
</p>
</div>
<div class="row">
<div class="card border-info" th:each="forecast : ${reportModel.report.forecast}">
<div class="card-body text-info">
<p class="card-text" th:text="${forecast.date}">日期</p>
<p class="card-text " th:text="${forecast.type}">天气类型</p>
<p class="card-text" th:text="${forecast.high}">最高温度</p>
<p class="card-text" th:text="${forecast.low}">最低温度</p>
<p class="card-text" th:text="${forecast.fengxiang}">风向</p>
</div>
</div>
</div>
</div>
<script src="https://code.jquery.com/jquery-3.2.1.slim.min.js"
integrity="sha384-KJ3o2DKtIkvYIK3UENzmM7KCkRr/rE9/Qpg6aAZGJwFDMVNA/GpGFF93hXpG5KkN"
crossorigin="anonymous"></script>
<script
src="https://cdnjs.cloudflare.com/ajax/libs/popper.js/1.12.3/umd/popper.min.js"
integrity="sha384-vFJXuSJphROIrBnz7yo7oB41mKfc8JzQZiCq4NCceLEaO4IHwicKwpJf9c9IpFgh"
crossorigin="anonymous"></script>
<script
src="https://maxcdn.bootstrapcdn.com/bootstrap/4.0.0-beta.2/js/bootstrap.min.js"
integrity="sha384-alpBpkh1PFOepccYVYDB4do5UnbKysX5WZXm3XxPqe5iKTfUKjNkCk9SaVuEZflJ"
crossorigin="anonymous"></script>
<script type="text/javascript" th:src="@{/js/weather/report.js}"></script>
</body>
</html>
|
其中下拉框选中向后端请求每个城市数据的js:
1
2
3
4
5
6
7
| $(function(){
$("#selectCityId").change(function(){
var cityId = $("#selectCityId").val();
var url = '/report/cityId/'+ cityId;
window.location.href = url;
})
});
|
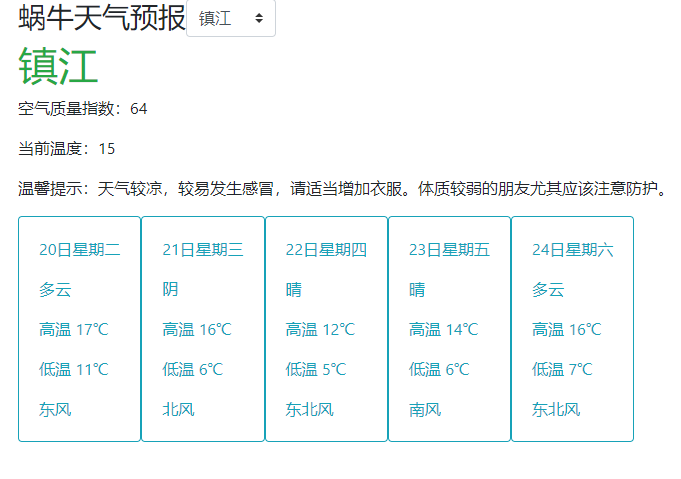
最后的效果: