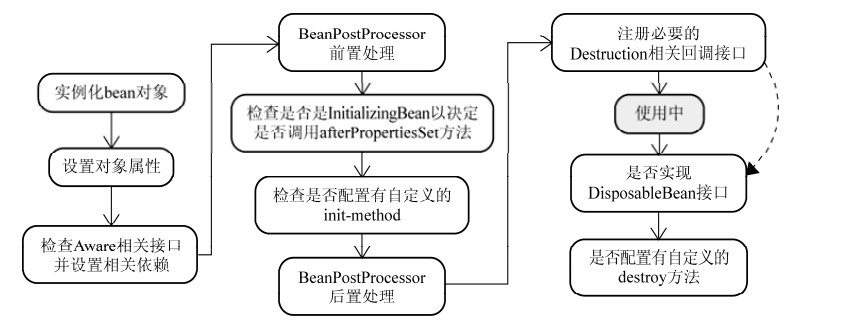
我们在之前说到过bean的生命周期,其中提到了很多初始化方法,搞得我们晕头晕脑,本文就是来解决这个问题,对bean生命周期中重要的几个初始化和销毁接口或注解进行消息阐述,使得对bean的生命周期理解更加轻松。
1. @Bean指定初始化和销毁方法
bean生命周期:bean创建----初始化----销毁的过程
容器管理bean的生命周期,我们可以自定义初始化和销毁方法,容器在bean进行到当前生命周期的时候来调用我们自定义的初始化和销毁方法。
用xml配置的方式,可以指定init-method和destory-method;
那么注解如何做到自定义的初始化和销毁方法呢?
我们先来创建一个Dog的类:
1
2
3
4
5
6
7
8
9
10
11
12
13
| public class Dog {
public Dog(){
System.out.println("Dog constructor....");
}
public void init(){
System.out.println("Dog init...");
}
public void destory(){
System.out.println("Dog destory...");
}
}
|
写一个配置类来注册这个Dog:
1
2
3
4
5
6
7
8
| @Configuration
public class MainConfigOfLifeCycle {
@Bean
public Dog dog(){
return new Dog();
}
}
|
先来启动容器:
1
2
3
4
5
| @Test
public void test01(){
AnnotationConfigApplicationContext applicationContext = new AnnotationConfigApplicationContext(MainConfigOfLifeCycle.class);
System.out.println("容器已经启动成功...");
}
|
那么打印结果是:
1
2
| Dog constructor....
容器已经启动成功...
|
那如何指定我们自定义的初始化和销毁方法呢?
首先修改一下测试方法,增加一句关闭容器:
1
2
3
4
5
6
| @Test
public void test01(){
AnnotationConfigApplicationContext applicationContext = new AnnotationConfigApplicationContext(MainConfigOfLifeCycle.class);
System.out.println("容器已经启动成功...");
applicationContext.close();
}
|
然后在@Bean注解上指定初始化方法和销毁方法:
@Bean(initMethod = “init”,destroyMethod = “destory”)
再次启动,显示:
1
2
3
4
| Dog constructor....
Dog init...
容器已经启动成功...
Dog destory...
|
但是注意单例和多例的区别,现在我将其配置成多例,由于多例是每次访问才会创建bean,所以我们还需要访问一下。
最后的打印结果是:
1
2
3
4
5
| 容器已经启动成功...
Dog constructor....
五月 28, 2018 3:49:33 下午 org.springframework.context.annotation.AnnotationConfigApplicationContext doClose
信息: Closing org.springframework.context.annotation.AnnotationConfigApplicationContext@16f65612: startup date [Mon May 28 15:49:32 CST 2018]; root of context hierarchy
Dog init...
|
说明在多例的情况下,容器最后不会销毁这个bean。
⭐总结一下:
注解如何指定bean的初始化和销毁:@Bean注解后面指定init-method和destory-method
初始化:对象创建完成之后,并赋值好,在调用初始化方法
销毁方法:单例:容器关闭的时候销毁;多例:容器不会管理这个bean,容器不会调用销毁方法
2. InitializingBean和DisposableBean
除了上一种用@Bean的方式来指定bean的初始化和销毁之外,spring还提供了另外的方法来实现。
初始化:
让Bean实现InitializingBean接口并且实现它的afterPropertiesSet方法,他的作用时机是:当一个BeanFactory创建之后并且所有的属性值已经被设置完成之后,可以调用这个方法来进行初始化的工作。
1
2
3
| public interface InitializingBean {
void afterPropertiesSet() throws Exception;
}
|
销毁:
让Bean实现DisposableBean接口并且实现destroy方法,他的作用时机是BeanFactory销毁的时候也将单实例bean给销毁掉。
1
2
3
| public interface DisposableBean {
void destroy() throws Exception;
}
|
示例:
1
2
3
4
5
6
7
8
9
10
11
12
13
14
15
| public class Cat implements InitializingBean,DisposableBean{
public Cat(){
System.out.println("cat constructor...");
}
@Override
public void destroy() throws Exception {
System.out.println("cat destory...");
}
@Override
public void afterPropertiesSet() throws Exception {
System.out.println("cat afterPropertiesSet init...");
}
}
|
最后打印一下,发现达到了一样的效果:
1
2
3
4
| cat constructor...
cat afterPropertiesSet init...
容器已经启动成功...
cat destory...
|
3. @PostConstruct&@PreDestory
@PostConstruct:bean创建好并且赋值好属性值之后执行一些初始化工作
@PreDestory:在容器销毁bean之前通知我们进行清理工作
1
2
3
4
5
6
7
8
9
10
11
12
13
14
15
| public class Pig{
public Pig(){
System.out.println("pig constructor...");
}
@PostConstruct
public void init(){
System.out.println("pig init...");
}
@PreDestroy
public void destory(){
System.out.println("pig destory...");
}
}
|
一样的效果。
4. BeanPostProcessor-后置处理器
这是一个接口,bean的后置处理器,在bean初始化前后进行一些处理工作,有两个方法,一个是初始化之前处理,一个是初始化之后处理。
具体的执行时机:
postProcessBeforeInitialization是在bean实例生成之后,在任何的初始化方法之前(比如InitializingBean接口的afterPropertiesSet方法;比如init-method方法)
postProcessAfterInitialization与上面个完全相反,在任何的初始化方法完成之后再调用。
1
2
3
4
5
| public interface BeanPostProcessor {
Object postProcessBeforeInitialization(Object var1, String var2) throws BeansException;
Object postProcessAfterInitialization(Object var1, String var2) throws BeansException;
}
|
示例:
我这里将上面的Dog,Cat,Pig全部用起来。pig用到init-destory和destory-method方法;cat实现InitializingBean,DisposableBean这两个接口;pig是实现@PostConstruct和@PreDestory这两个接口。
再加上后置处理器:
1
2
3
4
5
6
7
8
9
10
11
12
13
14
15
16
17
18
19
20
21
22
| @Component
public class MyBeanPostProcessor implements BeanPostProcessor{
@Override
public Object postProcessBeforeInitialization(Object bean, String beanName) throws BeansException {
System.out.println("postProcessBeforeInitialization..."+beanName+"=>"+bean);
return bean;
}
@Override
public Object postProcessAfterInitialization(Object bean, String beanName) throws BeansException {
System.out.println("postProcessAfterInitialization..."+beanName+"=>"+bean);
return bean;
}
}
|
一起启动,看看是什么先后顺序:
1
2
3
4
5
6
7
8
9
10
11
12
13
14
15
16
17
18
19
20
21
22
23
24
25
26
| //1.首先是Dog对象创建
//2.然后是在任何的初始化方法之前执行postProcessBeforeInitialization
//3.然后初始化init
//4.init初始化之后执行postProcessAfterInitialization
Dog constructor....
postProcessBeforeInitialization...dog=>com.swg.bean.Dog@157632c9
Dog init...
postProcessAfterInitialization...dog=>com.swg.bean.Dog@157632c9
//同理
cat constructor...
postProcessBeforeInitialization...cat=>com.swg.bean.Cat@64c87930
cat afterPropertiesSet init...
postProcessAfterInitialization...cat=>com.swg.bean.Cat@64c87930
//同理
pig constructor...
postProcessBeforeInitialization...pig=>com.swg.bean.Pig@4de5031f
pig init...
postProcessAfterInitialization...pig=>com.swg.bean.Pig@4de5031f
容器已经启动成功...
五月 28, 2018 4:29:27 下午 org.springframework.context.annotation.AnnotationConfigApplicationContext doClose
信息: Closing org.springframework.context.annotation.AnnotationConfigApplicationContext@16f65612: startup date [Mon May 28 16:29:26 CST 2018]; root of context hierarchy
pig destory...
cat destory...
Dog destory...
|
⭐⭐⭐其实顺序是这样的:Constructor > @BeanPostProcessor前置处理 > @PostConstruct > InitializingBean > init-method > @BeanPostProcessor后置处理

5. BeanPostProcessor原理
首先是创建IOC容器:
1
| AnnotationConfigApplicationContext applicationContext = new AnnotationConfigApplicationContext(MainConfigOfLifeCycle.class);
|
进去之后是构造器:
1
2
3
4
5
| public AnnotationConfigApplicationContext(Class... annotatedClasses) {
this();
this.register(annotatedClasses);
this.refresh();
}
|
这个refresh方法中有finishBeanFactoryInitialization这个方法:
1
2
|
this.finishBeanFactoryInitialization(beanFactory);
|
finishBeanFactoryInitialization这个方法中有一个方法是:
1
2
| //真正初始化剩下的所有非懒记载的单例bean
beanFactory.preInstantiateSingletons();
|
下面就是获取bean,获取不到就创建对象。
上面已经完成了对象的创建。下面就是进行属性赋值和初始化工作。
1
2
3
4
5
6
7
8
| 1、赋值
先执行populateBean方法,是对bean进行属性赋值
2、初始化
applyBeanPostProcessorsBeforeInitialization
invokeInitMethods:执行初始化方法
applyBeanPostProcessorsAfterInitialization
|
6. BeanPostProcessor在spring底层的使用
aop最基本的原理就是通过动态代理(jdk,cglib)来构造出一个代理对象,在容器创建bean的时候替换原来的bean。
是谁来创建这个代理对象呢?AnnotationAwareAspectJAutoProxyCreator,这个玩意就是BeanPostProcessor的某个子类。
关于Spring AOP的具体实现,还是比较复杂的,具体的代码以后再去研究,这里给出一个大概的步骤:
@EnableAspectJAutoProxy 会注册一个AnnotationAwareAspectJAutoProxyCreatorAnnotationAwareAspectJAutoProxyCreator是一个InstantiationAwareBeanPostProcessor- 创建流程
registerBeanPostProcessors() 注册后置处理器,创建
AnnotationAwareAspectJAutoProxyCreatorfinishBeanFactoryInitialization 初始化剩下的单实例Bean
- 创建
Bean和切面
AnnotationAwareAspectJAutoProxyCreator拦截创建过程- 创建完
Bean判断是否需要增强。通过BeanPostProcessorsAfterInitialization,
wrapIfNecessary() 包装代理对象
- 执行目标方法
- 获取拦截器链(
advisor包装为Interceptor)
- 递归调用拦截器链
总结
- 执行初始化和销毁方法
- 通过
@Bean指定init-destory和destory-method方法
- 通过让
Bean实现InitializingBean(定义初始化逻辑),DisposableBean(定义销毁前的逻辑)
- 通过使用JSR250规范中的
@PostConstruct和@PreDestory来进行初始化工作和销毁之前的工作
BeanPostProcessor:bean的后置处理器,在bean初始化前后进行一些处理工作
