
1、项目初始化相关基础知识
主要用的是commonJS+webpack来实现一个商城前端,由于是后端入门,因此有必要先对用到的东西给进行简单的介绍。
1.git仓库
这一块就比较简单了,对于git的安装以及ssh key的配置就不再赘述了,只说明一下比较重要的几个命令。在github上创建好对应的项目之后,比如我这里的:https://github.com/sunweiguo/mmall-front-study
第一步:git clone https://github.com/sunweiguo/mmall-front-study.git
这样,就拉到本地了。下面就可以在本地开发,先不说提交的事情,先说一说另一种情况。
比如我一开始本地自己新建一个文件夹叫做:mmall-front=study,在里面我新建一个文件叫做test.html。此时我想把这个目录下的文件也放到git仓库中如何做呢?
第一步git初始化这个目录:git init
第二步就是将本地这个目录与远程仓库对应上:git remote add origin https://github.com/sunweiguo/mmall-front-study.git
第三步是从远程的master分支拉取代码下来:git pull origin master
下面就是提交目录下面的东西了,步骤都是一样的:
第一步:git add .
第二步:git commit -am 'xxx'
第三步:git push (--set-upstram origin master)
这样就提交远程仓库成功了。
如果要切换分支,假设这个分支还不存在:git checkout -b m_v1.0,解释一下,checkout表示切换分支,-b表示这个分支还不存在,需要新建。
查看分支:git b.
2.项目目录
1 | src |
3.commonJS
CommonJS是服务器端模块的规范,Node.js采用了这个规范。
根据CommonJS规范,一个单独的文件就是一个模块。
加载模块使用require方法,该方法读取一个文件并执行,最后返回文件内部的exports对象。
1 | // addition.js |
上面的语句定义了一个加法模块,做法就是在exports对象上定义一个do方法,那就是供外部调用的方法。使用的时候,只要用require函数调用即可。
1 | var add = require('./addition'); |
CommonJS规范加载模块是同步的,也就是说,只有加载完成,才能执行后面的操作。
4.webpack
感觉这一篇文章写的不错:前端工程化——Webpack入门使用。
简单来说,就是一切都可以当成模块,require引入,不是js的通过loader解释一下,然后打包到一个js文件,html页面在script引入它。
5.nodejs&npm
构建工具webpack依赖于nodejs环境,nodejs是一个基于谷歌的V8引擎的javascript运行环境,用的是一个事件驱动的、非阻塞的IO模型,适用于低运算高IO的场景,比如聊天室。
而NPM是什么呢?它其实一个资源库,拥有世界上最大的开源库,因此你想要用什么库基本都能找到。因此应用比较广泛。
6.fiddler
是一个抓包工具,也可以用作代理工具。代理是什么?就是中间多了一个代理商,帮助我们处理请求:
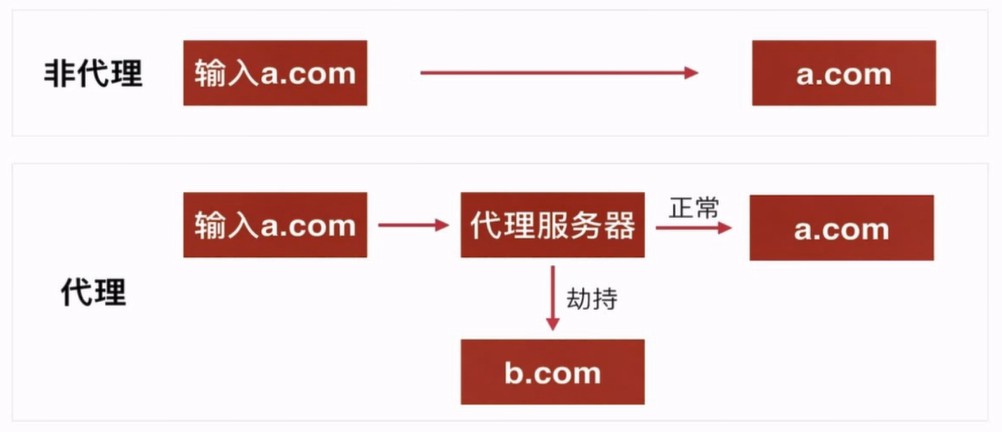
代理工具有什么用呢?比如我这里的mmall这个项目,本地开发都是localhost:8080去请求前端的资源,但是如果此时后端接口假如是api.mmall.com,那么就会产生跨域问题,此时,我们访问前端资源还用localhost这个域名,但是当访问后端接口的时候,就可以对这个localhost进行劫持,将其改为api.mmall.com,这样完美解决了开发环境中跨域问题。
7.项目初始化
首先在准备好上面工作之后,其实也没啥,就是git处理完成之后,在项目目录下执行npm init,会提示你输入一些信息,都是无关紧要的东西,比如我的:
我的环境都是在windows下,我的nodejs版本是8.11.1,出问题后面再改。npm版本是5.6.0。webpack版本是1.15.0。
1 | $ npm init |
全局安装webpack:npm install -g webpack@^1.15.0。
我们可以试一下demo:
比如比较简单的情况,就是单一的文件。比如一个入口文件index.js:
1 | cats = require('./cats.js'); |
这里引用的cats.js:
1 | var cats = ['dace','henry','martha']; |
此时,我们可以用命令行规定一个入口文件以及输出文件即可:
1 | webpack ./src/page/index/index.js ./dist/app.js |
顺利的话就会看到生成一个dist文件夹,里面有一个app.js文件,但是这种方式比较简单,不能增加一些其他高级的东西,因此推荐下一种方式。
我们设置一个配置文件叫做:webpack.config.js文件作为打包的入口文件。里面的内容为:
1 | module.exports = { |
命令行直接输入webpack即可。入门的使用到此结束。