一、JEST客户端实现产品搜索接口
上节完成了ELK平台的搭建,经过检验,确实可以实现全文检索的功能,这里在代码层面真正完成产品搜索等服务。
controller层非常简单:
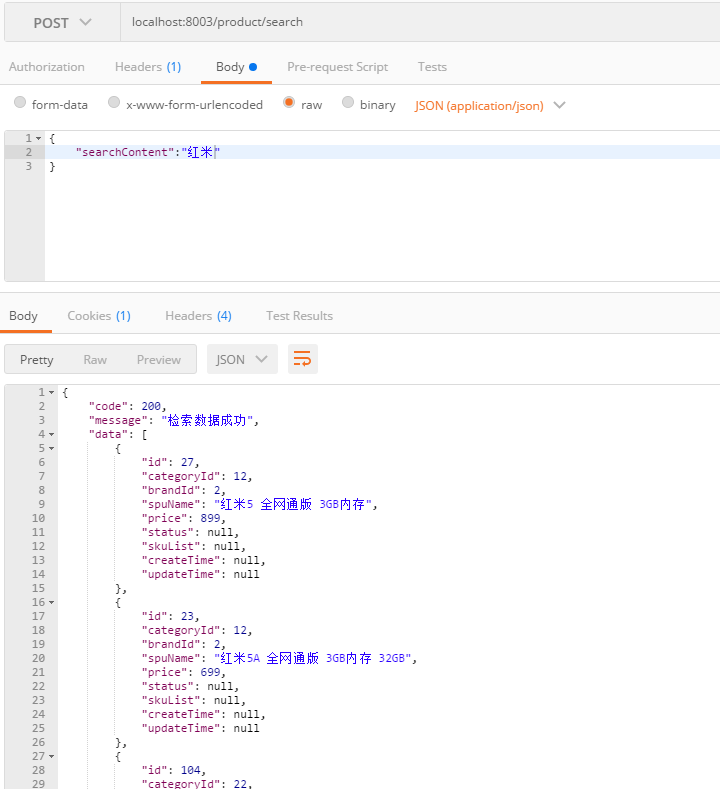
1
2
3
4
5
6
7
8
@RequestMapping ("/search" )public ApiResult<List<Product>> searchProduct(@RequestBody PageSearch pageSearch) throws IOException { ApiResult<List<Product>> result = new ApiResult<>(200 ,"检索数据成功" ); List<Product> data = productService.search(pageSearch.getPageNumber(),pageSearch.getPageSize(),pageSearch.getSearchContent()); result.setData(data); return result; }
首先引入相关的依赖:
1 2 3 4 5 6 7 8 9 10 <dependency > <groupId > org.elasticsearch</groupId > <artifactId > elasticsearch</artifactId > </dependency > <dependency > <groupId > io.searchbox</groupId > <artifactId > jest</artifactId > </dependency >
这里说一说jest。
Jest 是一个Java 版的ElasticSearch Http Rest 客户端,基于HttpClient 封装实现。
因为我们在上一节中用kibana可视化平台发送类似于这样的命令:
1
2
3
4
5
6
7
8
9
10
11
12
13
14
GET /jdbc/_search { "query": { "match": { "spu_name": "蓝" } }, "highlight": { "require_field_match": false, "fields": { "*": {} } } }
其实就是说,我们通过kibana给elasticsearch发送了一个restful的一个http get请求,那么现在的问题就是:如何用java代码来封装成这样一个请求。最先想到的肯定是用HttpClient,但是不够方便,正好jest这个工具类帮助我们实现了这个功能。
它就是在httpclient的基础上进行封装,将请求包装成上面那种形式发送给ES,ES给相应信息,它可以接收到,然后我们再解析即可。
要将这个客户端注册到spring中,service层中才能注入使用。
1 2 3 4 5 6 7 8 9 10 11 12 13 14 @Bean public JestHttpClient getESClient () throws UnknownHostException JestClientFactory factory = new JestClientFactory(); factory.setHttpClientConfig(new HttpClientConfig .Builder("http://" +parameters.getEsHost()) .multiThreaded(true ) .readTimeout(10000 ) .build()); JestHttpClient client = (JestHttpClient)factory.getObject(); return client; }
具体来看看service层:
1 2 3 4 5 6 7 8 9 10 11 12 13 14 15 16 17 18 19 20 21 22 23 24 25 26 27 28 29 30 31 32 33 34 35 36 37 @Override public List<Product> search (int pageNumber, int pageSize, String searchContent) throws IOException if (pageSize==0 ) { pageSize = PAGE_SIZE; } if (pageNumber<=0 ) { pageNumber = PAGE_NUMBER; } SearchSourceBuilder searchSourceBuilder = new SearchSourceBuilder(); searchSourceBuilder.query(QueryBuilders .boolQuery() .must(QueryBuilders.matchQuery("spu_name" ,searchContent)) .must(QueryBuilders.matchQuery("status" ,1 ))) .from(pageNumber*pageSize) .size(pageSize); searchSourceBuilder.highlight() .field("spu_name" ) .preTags("<em>" ).postTags("</em>" ) .fragmentSize(200 ); Search search = new Search.Builder(searchSourceBuilder.toString()) .addIndex("jdbc" ) .build(); SearchResult response = esClient.execute(search); String jsonString = response.getJsonString(); List<Product> productList = parseResult(jsonString); return productList; }
下面进行测试:
二、spring cache来实现分类的查询和缓存
controller接口:
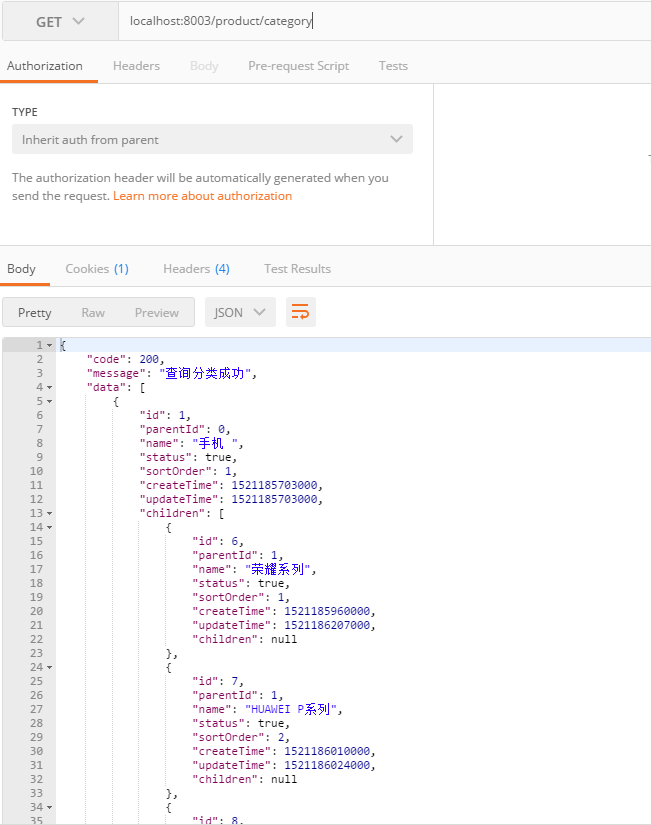
1
2
3
4
5
6
7
8
9
10
@RequestMapping ("/category" )public ApiResult<List<Category>> listCategory(){ ApiResult<List<Category>> result = new ApiResult<>(200 ,"查询分类成功" ); List<Category> list = productService.listCategory(); result.setData(list); return result; }
其中service层:
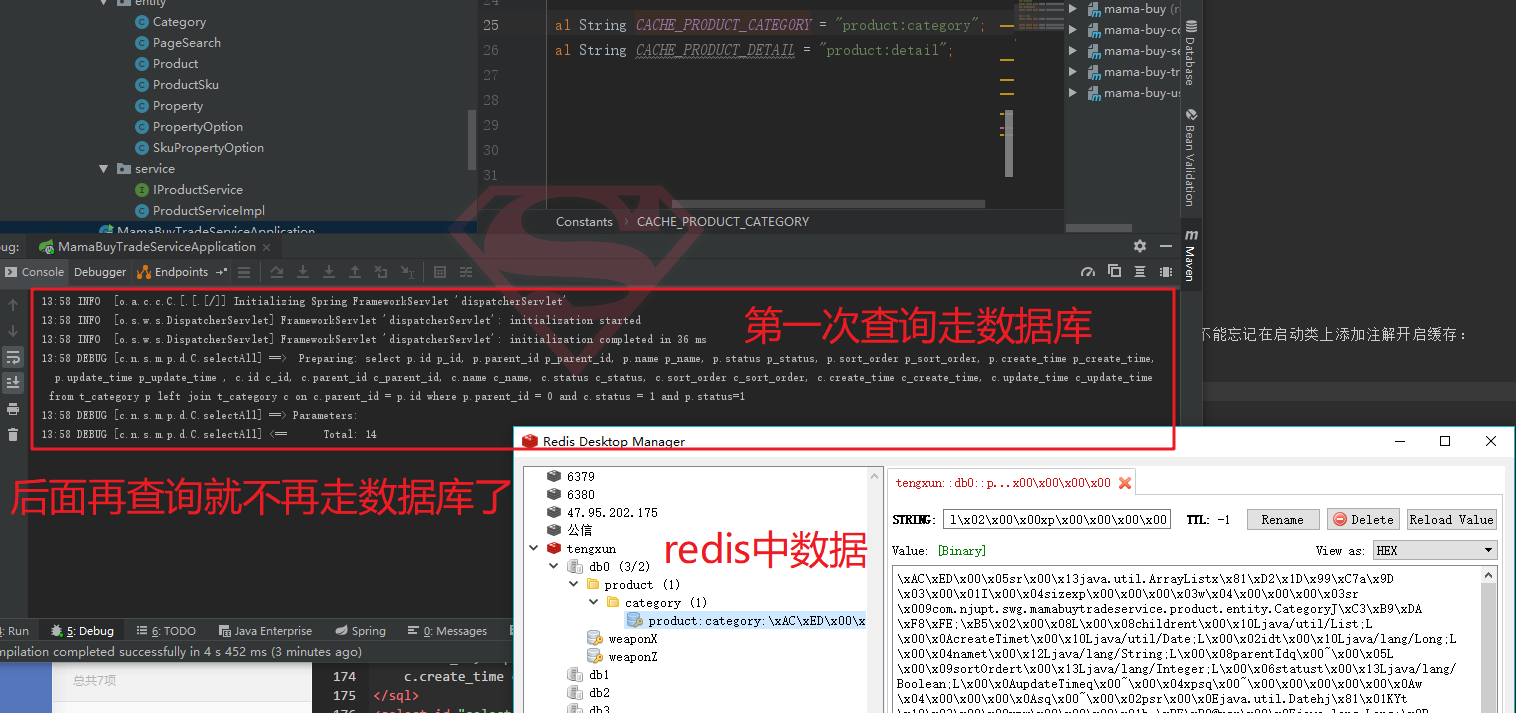
1
2
3
4
5
@Override @Cacheable (cacheNames = Constants.CACHE_PRODUCT_CATEGORY)public List<Category> listCategory () return categoryMapper.selectAll(); }
我们注意到,这里添加了注解@Cacheable,这一行注解就可以将其查询出来的结果缓存到redis中,是不是特别地方便。不能忘记在启动类上添加注解开启缓存:
这里要注意,分类是有层级的,那么展示所有层级的分类有两种方式,一种是直接在sql中实现:
1 2 3 4 5 6 7 8 9 10 11 12 13 14 15 16 <sql id ="Category_Column_List" > p.id p_id, p.parent_id p_parent_id, p.name p_name, p.status p_status, p.sort_order p_sort_order, p.create_time p_create_time, p.update_time p_update_time </sql > <sql id ="Children_Column_List" > c.id c_id, c.parent_id c_parent_id, c.name c_name, c.status c_status, c.sort_order c_sort_order, c.create_time c_create_time, c.update_time c_update_time </sql > <select id ="selectAll" resultMap ="CategoryResultMap" > select <include refid ="Category_Column_List" /> , <include refid ="Children_Column_List" /> from t_category p left join t_category c on c.parent_id = p.id where p.parent_id = 0 and c.status = 1 and p.status=1 </select >
还有一种就是在代码层面实现,思路很简单,就是用一个Set集合,先存放所有的一级分类,然后递归查询它下面的所有子分类。这个方式在电商项目中用到的。本节用的是sql方式直接去查询。
测试缓存是否生效:
三、商品详情展示
1 2 3 4 5 6 7 8 9 10 11 12 13 14 15 @RequestMapping ("/detail/{id}" )public ApiResult<Product> productDetail (@PathVariable Long id) ApiResult<Product> result = new ApiResult<>(200 ,"获取商品详情成功" ); Product product = productService.productDetail(id); result.setData(product); return result; }
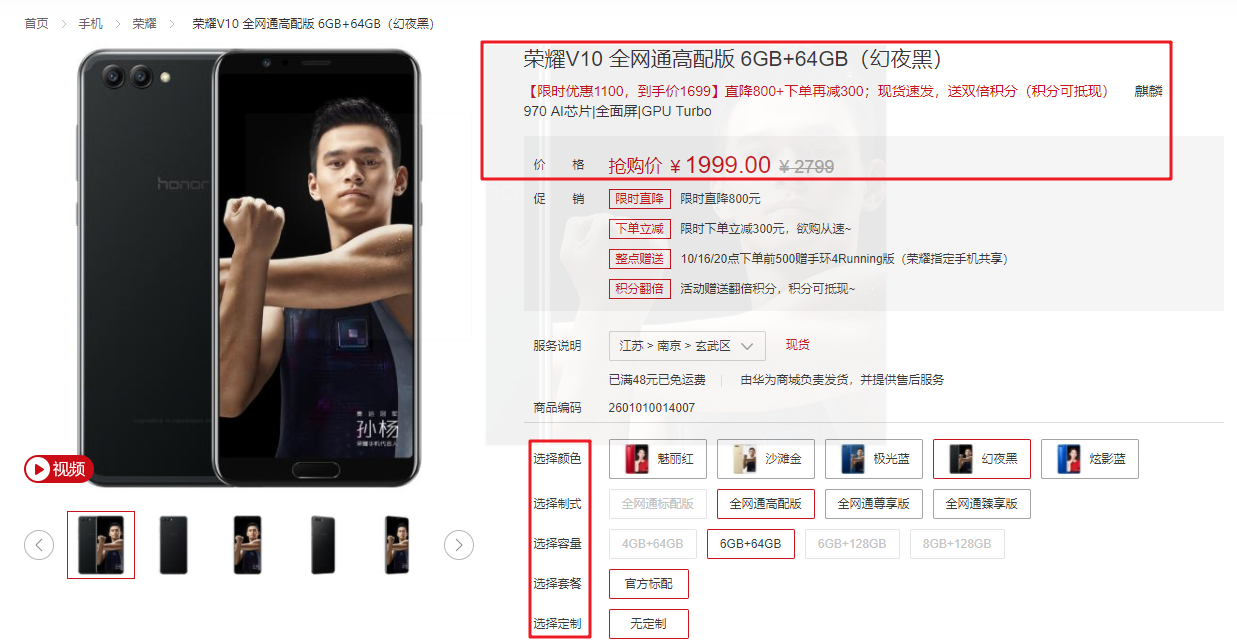
我们在《交易工程上》中分析了一下,这一块是比较复杂的,因为涉及的东西比较多。这个产品下面有很多的sku,再将那张图拿过来:
对应着实际页面是:
那么,从表中我们可以看出,要完成这个详情页面,借助于三张表,那么就对应着三个bean。就是product里面包含着ProductSku,而ProductSku里面包含着SkuPropertyOption。
1
2
3
4
5
6
7
8
9
10
<select id="selectByPrimaryKeyWithSku" resultMap="ProductResultMapWithSku" parameterType="java.lang.Long" > select <include refid="Product_Column_List" />, <include refid="Sku_Column_List" />, <include refid="Sku_Option_Column_List" /> from t_product p left join t_sku s on s.spu_id = p.id left join t_sku_property_option o on o.sku_id = s.id where p.id = #{id ,jdbcType=BIGINT } and s.enable_flag = 1 and o.enable_flag = 1 </select >
库存工程当然还没有结束,交易这个功能将会持续集成。